Wednesday, December 25, 2013

"Happy Holiday's"... by PINQUETTE Rhonda

~~**Merry Christmas & Happy Holiday's**~~

~~~***~~~***~~~
Howdy Crafters...
Hope everyone is having a wonderful Christmas...
I have created a Christmas card using the ADORABLE Spendid Swirl from PINQUE PEACOCK... and Graphic 45. These handmade embellishments are so awesome to use on all your carfting. Stop by the shop and check out these Spendid Swirls that you can order in varies sizes and be sure to shop the FABRIC OPTIONS to custom order yours!!! I added a flatback and buckle to the center, added lace from the Angela Holt Designs Shabby Chic Kit, some scrap cardstock and G45's
The Twelve Day's of Christmas Collection- Holly and Ivy....


~~~***~~~***~~~

Visit PINQUE PEACOCK to order custom handmade
embellishments you'd like for your crafting needs!!!
Also, Stop by and become a follower then check out the
the 300 Follower Giveaway at PINQUE PEACOCK
Wishing all you crafters a very Merry Christmas and a Happy New Year!!!
~~**PEACE**~~
~~~***~~~***~~~

https://www.facebook.com/PinquePeacock

Friday, December 20, 2013

~~**Christmas Gift Mini Journal**~~

~~**~~**~~**~~
HELLO CRAFTERS!!!!
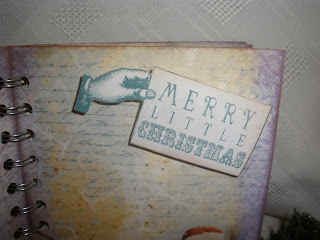
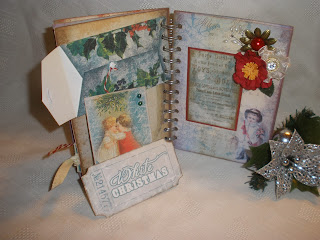
Today I have a revamp of my Christmas Mini using the "Christmas Gift Printable Journal" from Tsunami Rose Designs. From the journal I have used the coin envelopes and tags for pockets and journaling.. From Miriam's Crafting Supplies I have added some of her beautiful vibrant red flatback pearls, several metal embellishments and a cool crystal embellie... which I love!!! I took a metal flower embellishment in the corner of a page to hold a tag and also one of her star flatback to finish the top of tree of this adorable coin envelope, which also make awesome gift card holders! I used a wire spine to bind this altogether. There are so many BEAUTIFUL pages to this journal... it's not only great for creating a mini, but you can make cards, gift tags for those holiday presents and of course my favorite gift card holders!!!


If you haven't checked out the GORGEOUS printables created by
Owner and Designer Daisy Collins... you're missing out!
She has some AWESOME STUFF!!!... and if you still need something for that crafter... visit TSUNAMI ROSE DESIGNS to order them a Gift Certificate!!!
 
http://www.zibbet.com/tsunamirose/artwork?artworkId=1860818 http://www.zibbet.com/tsunamirose/artwork?artworkId=1860819
~~**~~**~~**~~
 
http://www.zibbet.com/tsunamirose/artwork?artworkId=1192197http://www.zibbet.com/tsunamirose/artwork?artworkId=1790852

http://www.zibbet.com/tsunamirose
Tsunami Rose Designs Links

Monday, December 16, 2013

~~**Holiday Centerpiece using ETCHALL**~~

 MERRY CHRISTMAS!!!...
&
~~**HAPPY HOLIDAYS**~~
Today I have a tutorial from ANGELA HOLT DESIGNS
using the awesome product from  Etchall
~~**~~**~~**~~

Etchall etching crème is a re-usable crème that produces
a white opaque, permanent etched finish on glass, mirror,
ceramic, porcelain, marble and slate.
 
~~**~~**~~**~~
First I began by cutting out a snowflake pattern with vinyl using my Silhoutte CAMEO.
Once I cut it out I took  transfer tape and adhered it to the patteren... this allows
you to transfer the pattern onto your project piece... and the great thing about Etchall is you can find all these products on their website for all your etching projects


~~**~~**~~**~~
Now once applied you MUST work out the air bubbles to get a seal onto your project piece.... you don't want any bubbles to allow the ETCHALL to seap under the vinyl. Use the squeegie, found at etchall, to work out those air bubbles... after all you don't want to make an oopsy!!!
I randomly added several snowflakes to my piece!


~~**~~**~~**~~
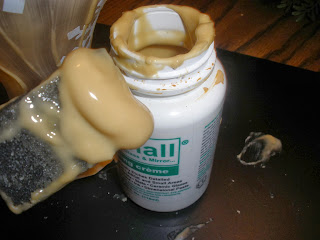
Next you want to apply the cream on... working out it all over with the squeegie and the secret is to apply the cream on THICK LIKE PEANUT BUTTER... hehehehe! I love that :D
Leave on for 15 minutes!!!


~~**~~**~~**~~
Now the COOL THING about ETCHALL... you simply scrap  
off the cream once the time is up and return it to the
jar for more uses on other projects!!!
ISN'T THAT AWESOME!!!


~~**~~**~~**~~
Next step... HEAD TO THE SINK and give your piece
a real good rinsing to remove the excess left behind!!!
EASY PEASY!!!!


~~**~~**~~**~~
Here is the Chimney once the etching process is complete,
 but I wanted to one step further so I left my snowflakes on for this part too...

 
~~**~~**~~**~~
So using Arclyic paint I made a "white wash" by
just adding some water to my paint!


~~**~~**~~**~~
 I applied the wash and then with a paper towel and working in the same
direction I wiped the "white wash" back off... I wanted this to have a frosty snowy look!!!


 You see the really awesome part to ETCHALL is it can be painted!!!
Visit the website to check out all the GORGEOUS projects
that have been created doing this process :)
 
~~**~~**~~**~~
Next I used my heat gun to help set the wash, removed the
vinyl and then let it dry over night!!!


~~**~~**~~**~~
 TAAA DAAA.... here is my holiday centerpiece using Etchall...
Visit the website for everything you need to do your
etching projects... Vinyl, transfer paper, tools and more!!!
For the floral part I used holiday floral pics, greenery, gold lamay wired ribbon,
a 5" candle, Aleene's glitter snow, styrophome and a candle spike


This is going to my good friend Jessica... she won it
during a Secret Santa game we participated in!!!